Workspace ONE Configuration
1. Login to the admin portal and navigate to Catalog > Web Apps

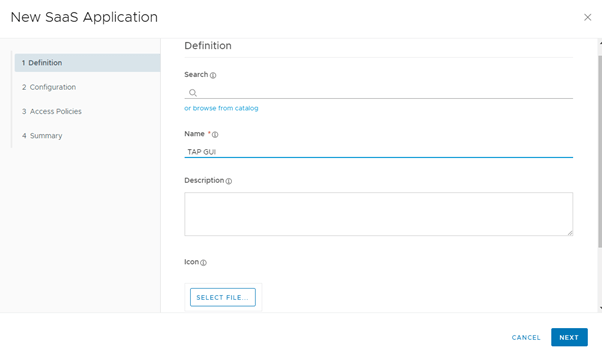
2. Create a new Web App by selecting the New button

3. Enter the Name and if desired select an icon and add a description for the Web App in Workspace ONE
4. Web App configuration
a. Set the Authentication Type to be “OpenID Connect”
b. Set the Target URL to be the URL of your Tanzu Application Platform GUI
c. Set the Redirect URL to be the URL of your Tanzu Application Platform GUI with the path suffix of “/api/auth/oidc/handler/frame”
d. Set the Client ID to be any descriptive name that makes sense such as “tap-gui”
e. Set the Client Secret to be a unique string (can be generated via a command such as “openssl rand -base64 32”)
f. Set the Show in User Portal to true


5. Select the access policy you want applied to your Web App

6. Validate on the summary page everything is correct and then click on Save and Assign to add access for users to the Web App

7. Select Users and or Groups via the search bar that should have access to the TAP GUI via Workspace ONE

8. Navigate to Catalog > Settings

9. Select the Remote App Access tab

10. Find your Web App in the list and click on it to view the advanced configurations

11. Click on the Edit button under the Scope section

12. Select the scopes as depicted in the picture bellow

13. Your Web App is now fully configured and ready to use with TAP GUI!
Tanzu Application Platform GUI Configuration
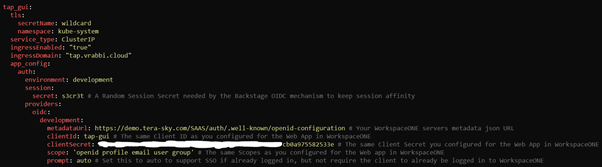
In your values file for the TAP installation where you will be installing TAP GUI you need to configure the Authentication backend to use our newly created Web App from WorkspaceONE as described bellow:
Once configured you can now either install TAP GUI or reconfigure it using the standard Tanzu CLI method.