One of the key features in Tanzu Application Platform is a tool called “Application Accelerator”.
In this blog post, we will try to cover what the tool is, why we need it, what makes up an accelerator, and try to give some examples of how these features can be used to build your own custom accelerators.
What is App Accelerator
App Accelerator helps you bootstrap developing your applications and deploying them in a discoverable and repeatable way.
You can think of app accelerator as a way to publish a software catalog to your end users, which will allow them to fill out a simple and customizable form, that will then generate a templated set of files which they can start iterating on for there new project.
Enterprise Architects author and publish accelerator projects that provide developers and operators in their organization ready-made, enterprise-conformant code and configurations.
App Accelerator, is based on the Backstage Software Template plugin, and enriches it with additional capabilities and features to make it extremely easy to use.
An accelerator is built up of 3 key components:
- A Git Repository based on which projects will be generated
- A file in that repository called accelerator.yaml with the definition of how to template the project
- A Kubernetes Custom Resource pointing at the base Git Repository
Lets examine these different components.
Base Repository
The base Git repository is a standard git repository where we can define whatever we want. this could contain for example a sample applications source code, kubernetes manifests, backstage configuration files, or really anything we want.
One of the great parts of App Accelerator is that we can literally template anything we want. You could for example build an accelerator that generates a base structure for a Carvel package, or perhaps a TKG cluster config file. Truly, the sky is the limit!
This Git Repository can be either public or private based on your needs. It also supports sub-paths within a repo making the structure of how you lay out your accelerators very flexible.
The only special thing in this repository is the next component we will discuss which is the accelerator.yaml file which we must have in the repository.
Accelerator Yaml
As mentioned above, the only unique file we have in our base repository is the accelerator.yaml file.
By including an accelerator.yaml file in your Accelerator repository, you can declare input options that users fill in using a form in the UI. Those option values control processing by the template engine before it returns the zipped output files.
An Accelerator Yaml file, has 4 key parts which are accelerator, options, imports, and engine.
Accelerator Section
In this part of the yaml file, we define metadata about our accelerator. This can include things such as, the name of the accelerator, tags to assign to the accelerator to ease searching for the right accelerator via the UI or API, a description for the accelerator, and an icon to use in the catalog for the accelerator.
Options Section
The options section is where we build out the inputs to our accelerator, that will be used to template our project.
Options are defined as an array or objects with a few different options of keys we can define for each option, which will effect how i is exposed to the end user:
Name (Required)
This field which is the only required field, defines the name of the option which can then be used in our templating steps later on.
The name field must be provided in a camelCase format and cannot include special characters.
Label
The label field allows us to set a User Friendly string to be used as the label for this option in the App Accelerator form.
By default, if we don’t set a label, the name field will be used as the fields label.
Default Value
This field allows to define a default value for our option. This can be very helpful when a sane default value is available, but we still want the user to be able to customize the field if needed.
Input Type
This field allows us to specify the type of field we want to expose for this option. There are many different input types available such as:
- text (default) – a single line text box
- textarea – a multi-line string input field
- checkbox – allows an easy and elegant checkbox based list for either single or multi option inputs
- select – a dropdown list
- radio – a radio button list for single option inputs
Data Type
This field allows us to define the type of data we expect to receive in this input.
The valid types for this are, string, number, and boolean.
We can also accept an array value by simply using square brackets arount the type we want for example dataType: [string] for an input that expects an array of strings.
Required
This field accepts a boolean value, which denotes whether a field is required to be filled in by the user or not.
This can be extremely helpful when building out complex and rich accelerators, where we can decide as the architects, what a user needs to fill out for us to have enough information to template the new project for them.
Display
This field accepts a boolean value, which denotes whether this field should be displayed to the end user or not.
By using this value along with the default value field, we can hide specific inputs, but make the value usable by the templating engine.
Choices
This field can be used when the input type is of the types select, radio or checkbox.
This field is an array of objects with 2 keys, text and value. The text key is what will be shown to the user and the value key is what will be passed to the underlying engine.
Depends On
This field is an object with 2 keys, name and value.
This allows us to specify a dependency on a different option for whether this option will be visible or not.
A very common use case for this could be having a field called for example “Advanced Options” which is a boolean checkbox. when that value is set to true, we can display additional options we support, while making the initial form more palatable and easy to approach for the general use cases.
Validation Regex
This field allows us to define a regex in SPEL format which will be used to validate the input provided by the end user.
Using this field is a very good practice, to limit user input mistakes, and to ensure that the generated project contains a valid format.
Options which always exist
While nearly everything is up to the architect there is currently, one option which will always be included even when not specified which is “artifactId”. This option is displayed via the request form with the label “Name” and the description “Provide a name for your new project”.
Imports Section
The next section in the accelerator yaml file is an optional field that was added in TAP 1.2.
The imports section allows us to import one or more fragments (more on fragments later on in this post) into our accelerator, allowing for reuse of generalized functions across multiple accelerators.
This section receives an array of objects referencing the app accelerator fragments we want to use in this accelerator.
Each entry in this section must include a key “name” which will include the name of the fragment we want to import and can optionally include an additional key named “exposes”.
The exposes key, accepts an array of objects, that allows us to define which options from within the imported fragment we want to expose in the current accelerator. we can define specific dependent options here as well via the dependsOn key, and we can also in case of name clashes between different fragments, rename the value within the context of our accelerator via the “as” key.
Engine Section
The Engine section of our accelerator yaml file, is where we define the actual templating steps that will utilize the inputs the user has provided (defined in the options section and those imported via fragments) to generate our project for the requesting user.
When the accelerator engine executes the accelerator, it produces a ZIP file containing a set of files. The purpose of the engine section is to describe precisely how the contents of that ZIP file is created.
When you run an accelerator, the contents of the accelerator produce the result. It is made up of subsets of the files taken from the accelerator’s root directory and its subdirectories. You can copy the files as is, or transform them in a number of ways before adding them to the result.
As such, the YAML notation in the engine section defines a transformation that takes as input a set of files in the root directory of the accelerator, and produces as output another set of files, which are put into the ZIP file.
Every transform has a type. Different types of transform have different behaviors and different YAML properties that control precisely what they do.
A few key terms and concepts must be understood before discussing the different transformation types we have at our disposal.
SpEL Expressions
SpEL or in full the Spring Expression Language is used with our accelerator yaml file, to express logic and conditionals, within the yaml structure itself.
SpEL is a powerful expression language that supports querying and manipulating an object graph at runtime. The language syntax is similar to Unified EL but offers additional features, most notably method invocation and basic string templating functionality.
While similar to OGNL and MVEL, SpEL was created and is supported within all of the Spring portfolio, making it a logical choice for VMware to implement within the product.
The use of SpEL allows us to for example make options and transformation steps conditional based on specific criteria, it allows us to perform regex validations and much more.
one key thing to note that can be a bit difficult at the beginning until you get used to it, is that SpEL notations, also include for example quotes and other special characters we need to make sure we escape correctly in our accelerator yaml file so that it is always a valid yaml document. If we don’t do this our accelerator will not succeed to be executed due to parsing issues.
While learning SpEL notations can take a bit of time, the power it gives us and the flexibility we gain through it, make the learning curve a worth while endeavor.
Conditional Transformations
As mentioned above, just like with options and imports, we can add conditional logic to a transformation step within the accelerator engine specification.
This allows to to for example, include a pom.xml file if the user selected a value in the options called useMaven, and to not include it otherwise.
The conditional transformations, are a key functionality in most modular and custom accelerators, allowing us to write more generic accelerators that can produce different subsets of projects based on inputs, rather then needing to create a whole new accelerator for every permutation we may want to expose to our end users.
Now lets take a look at the transformation types we have at our disposal.
As mentioned, there are multiple (14!) types of transformation types.
Combo
This is a meta transform type. VMware refer to the combo transform as the “swiss army knife” of transforms.
This transformation type, allows for a simpler and more natural structure of our other transformations nested beneath it, which get “combined” together into a single combo transformation.
A combo transform allows us to combine the behaviors of Include, Exclude, Merge, Chain, UniquePath, and Let transformations in a way that feels natural.
Include
When performing transformations, we often only want to run a specific transform on a set of files, and sometimes based on different inputs and transformation logic, we may want to the zip file of the generated project to only include a subset of the files in the base repository.
The Include transform retains files based on their path, letting in only those files whose path matches at least one of the configured patterns (configured via a simple SpEL expression). The contents of files, and any of their other characteristics, are unaffected.
You will almost never use an include transform on its own, but combined together with other transformation steps that manipulate the selected files, this becomes one of the key steps which almost all accelerators will end up having.
Exclude
The Exclude transform retains files based on their path, letting everything in except those files whose path matches at least one of the configured patterns (configured via a simple SpEL expression). The contents of files, and any of their other characteristics, are unaffected.
This is very similar to the include transformation, as it is almost never used on its own but is very useful and commonly used, when combined together with additional transformation steps.
Merge
The merge transformation type, is a very useful “meta” transformation mechanism.
A Merge takes the outputs of several transforms executed independently on the same input source set and combines or merges them together into a single source set.
Basically this allows us in the engine to specify many independent transformations, and have the end results of the transformations be merged together to provide the final output of the project.
A very useful and common use of the merger transformation is to use merges with overlapping contents to apply a transformation to a subset of files and then replace these changed files within a bigger context.
While this is great that we can use overlapping paths, within a merge transformation when this occurs, it is important to note, that the default behavior, is to use the last instance of the conflicting file paths and have its result be the final one.
This means that if we have 2 steps manipulating a README.md file within our merge transformation block, by default the README.md outputted by the second transformation step will be the one we receive in the final projects files.
The Merge Conflict resolution options however are configurable and we will discuss that further on in this document.
Chain
The chain transformation type, is a very useful “meta” transformation mechanism.
While a merge runs each step within it independently and then merges the outputs, in a chain transformation, step are run sequentially and the output from previous steps is fed into the following tasks.
I common example of the usefulness of chain transformations is with the ReplaceText transform. Used by itself, the ReplaceText transform replaces text strings in all the accelerator input files. What if you wanted to apply this replacement to only a subset of the files? You can use an Include transformation step to select only a subset of files of interest and chain that subset into a ReplaceText transformation step.
Using chains is almost inevitable when building a production ready accelerator, and the freedom it gives us is huge!
Let
The let transformation type, is a mechanism that wraps another transformation step and can provide it with additional variables uniquely available in the scope of that transformations scope.
We can define variables via a simple array of objects, where each object includes a “name” key with the name of our local variable, and an “expression” key, where we can provide a SpEL expression to be used as the value of that local variable.
This transformation, is especially helpful when using transformations such as YTT or InvokeFragment, in which we are executing an external mechanism, which often times may have many options we simply want to hard code in our specific accelerator.
This is a common case when using fragments which we will cover in depth later on in this blog post.
Invoke Fragment
As we discussed above, and will dive deeper into later, we can import “sub-accelerators” as sorts of reusable functions into our accelerators via the fragments mechanism.
While they are imported like traditional functions in any programming language above, the InvokeFragment transformation is the mechanism by which we can run these fragments.
At the point of invocation, all currently defined variables are made visible to the invoked fragment. Therefore, if it was import-ed in the most straightforward manner, a fragment defining an option myOption is defining an option named myOption at the accelerator level, and the value provided by the user is visible at the time of invocation.
To override a value, or if an imported option has been exposed under a different name, or not at all, you can use a let construct when using InvokeFragment. This behaves as the Let transform: for the duration of the fragment invocation, the variables defined by let now have their newly defined values. Outside the scope of the invocation, the regular model applies.
An invoke fragment also allows us to cope with situations where the base file structure expected by a fragment is different then that which is present in the accelerator itself by use of the anchor field which allows us to basically get a “chroot” like behavior for the files of our accelerator in the context of the fragments execution.
Replace Text
This is one of the most important and highly used transformation types available.
This allows us a “sed” like transformation type, which can replace a specific string with another string, or can also do more complex tasks such as replace text found based upon a regex, with the contents of a file.
We also have a set of helper functions that we can use with this transformation, that make certain tasks much easier.
The additional helper functions we have include a variable called “files” which has a function defined on it “contentsOf” which allows us to replace a string with the contents of a file.
We also have helper functions for converting cases of our strings. We can convert between camel, kebab, pascal and snake casing of strings by using a function in the format of 2, for example camel2kebab or snake2pascal.
As this transformation manipulates the text data of our files, we must use this with caution as unlike other transformations, this is pretty much a “free for all” and we must test our accelerators adequately to make sure we don’t mess up formatting.
Rewrite Path
The RewritePath transformation type allows you to change the name and path of files without affecting their content.
This transform has 3 main fields which we can configure.
The first field is “regex”. this is where we define the regex in SpEL format for finding the source files we want to rewrite the paths of.
The second field is “rewriteTo”. This is where we define a SpEL expressin where we can define how to rewrite the path.
The third and final field is “matchOrFail”. This field accepts a boolean value, and defaults to false. This is where we can define what happens if the regex doesn’t match a file. Setting this to true can help prevent misconfigurations if you expect all incoming files that are coming in to this execution to match the regex.
This is commonly used for changing paths of source code files based on for example application name which the end user would input, or moving for example a project specific README.md file which you way have in a sub-folder to the root of the generated project which can be helpful if you want to have a README.md file in the accelerator repo itself that is dedicated to the accelerator and a different one for the generated project.
Open Rewrite Recipe
While using the power of both the rewrite path and replace text transformations we can really manipulate any file content and file structure, when dealing with Java specifically we have a better option.
The OpenRewriteRecipe transformation type allows you to apply any Open Rewrite Recipe to a set of files and gather the results.
Open Rewrite is an open source project which enables large-scale distributed source code refactoring for framework migrations, vulnerability patches, and API migrations with an early focus on the Java language.
While the Open Rewrite project has many different categories of recipes, App Accelerator currently supports only the Java related recipes.
The Open Rewrite version used is 7.24.0 and java code is interpreted based on the Java 11 grammar so if using a different Java version be warned their could be some unexpected behaviors. The official Open Rewrite docs should be consulted to see all of the available recipes, and how to use them.
While only the Java subset of recipes is currently supported, this already includes 25 different recipes which can be extremely helpful when constructing an accelerator for a java based application.
While the scope of this transformation is much more limited then both the rewrite path and replace text transformations, because this transformation is not doing text based manipulation, but rather it understands the data it is dealing with, we get a lot of advantages such as type safety, and additional nice feature like correctly dealing with imports in our java code, and it can understand fully vs. non-fully qualified names and treat them accordingly without needing to write replace text functions for all permutations a package name for example could be defined as.
The scope of Open Rewrite as a project is growing and I hope we will see more integration with it and its different recipes, as well as similar tools for other languages and frameworks over time.
YTT
This is bar far one of my favorite and my in my opinion most useful transformation types we get access to in app accelerator.
YTT (Yaml Templating Tool) is an amazing project which is part of the Open Source Carvel toolset, developed and maintained by VMware.
This transform by default will take all files passed to it as well as expose all variables in the accelerator as data values, and execute YTT as an external process.
While we don’t need to pass any parameters to a YTT transformation, we do have access to an optional parameter “extraArgs” which receives an array or strings which can be plain strings or SpEL expressions, and will be passed along to the invocation of the YTT process.
Similar to the advantages of using OpenRewriteRecipe for Java files, the YTT transformation give us amazing capabilities for transforming and manipulating yaml files, in a data structure aware manner.
As everything we do today seems to include some yaml, especially in the kubernetes ecosystem, having a tool like YTT at our exposal inside App Accelerator, opens up huge capabilities.
Use Encoding
Whenever we are talking about manipulation of textual data, for example in the ReplaceText transformation, the engine needs to be aware of the encoding to use for the file.
As the idea is to make App Accelerator as easy to consume, and simple, while at the same time, provide customization capabilities, a default encoding is assumed which is set to UTF-8.
If any files must be handled differently, use the UseEncoding transform to annotate them with an explicit encoding.
While the vast majority of files we deal with are UTF-8 encoded, it is great to see that even niche use cases like this are covered in the platform, allowing us to be comfortable that we are covered with whatever we need to do.
Unique Path
This is a transformation type that can be used to ensure there are no path conflicts between files transformed. You can often use this at the end of a Chain transformation.
This transformation type receives a single parameter named “strategy”. The value of the strategy key can be any of the conflict resolution strategies supported in the platform which we will cover in the next transformation type.
If you are using the Combo meta transformation type, an implicit UniquePath transformation is embedded after the merge transformation.
Conflict Resolution
As discussed multiple times above, if you’re using Merge (or Combo’s merge syntax) or RewritePath transformations, a transformation can produce several files at the same path.
If and when this happens, the engine must take an action: Should it keep the last file? Report an error? Concatenate the files together? etc.
The ConflictResolution transformation type, can be used to resolve these conflicts.
There are 6 different resolution strategies which can be defined via this transformation:
- Fail – when used, on the first occurrence of a path conflict, the accelerator will stop being processed
- UseFirst – when used, the first file produced at this path is the one that will be retained
- UseLast – when used, the last file produced at this path is the one that will be retained
- Append – when used, all files at the conflicting path or concatenated together in the order in which they were defined from first to last
- FavorOwn – When using fragments, this will prefer the file coming from the current executing fragment if possible, with a fall back to the accelerator version otherwise.
- FavorForeign – When using fragments, this will prefer the file coming from the accelerator if possible, with a fall back to the fragment version otherwise.
We also have some defaulting behavior for both Combo transformations and for Chain transformations.
When using a Combo transformation, the default behavior is set to UseLast as the conflict resolution strategy. To change this implicit behavior, you can add at the end of the combo a field “onConflict” with the value of the conflict resolution strategy you would like to use.
When using a Chain transformation, the default behavior is implicitly set to Fail. to override this behavior, you can explicitly set a UniquePath transformation at the end of the chain transformation, and specify the resolution strategy you would like to use.
As you can see, our options for configuring an accelerator are huge, and the options truly are endless. Now that we understand the ideas and capabilities around our accelerators repository, lets take a look at how we connect that repository to the platform.
Accelerator CRD
As is the case with almost everything in TAP, we configure our application accelerators using CRDs.
The cluster on which we will add the custom resources will be the cluster on which TAP GUI and Application Accelerator are installed. In a multi cluster setup this will be the view profile based cluster and in a single cluster setup it will be on that single cluster.
The main CRD we will cover is the accelerator resource, which is a namespaced resource that must be created for each accelerator we want to make available in the platform.
This resource must be created in the namespace the App Accelerator UI deployment is configured which is by default accelerator-system.
Because this is a standard kubernetes CRD, we can manage our Accelerator CRs via any mechanism we would like such as imperative kubectl commands, CICD tooling or a GitOps mechanism like Kapp Controller, ArgoCD or FluxCD.
The spec of the accelerator CRD is extremely simple and basic with just the right amount of options in my opinion.
Like all kubernetes resources, we have a standard metadata section where we can specify labels, annotations, the name of the resource and the namespace in which we want to deploy the resource.
Next within the spec itself we have 3 main types of fields:
Visualization Fields
The visualization fields are similar to the options one could define in the accelerator.yaml file under the accelerator section.
This includes the following optional fields:
- tags – An array of strings that will be applied as filtering strings to the accelerator within the platform
- iconUrl – A URL for an image to represent the Accelerator in a UI
- displayName – A short descriptive name used for an Accelerator as the label
- description – Description is a longer description of an Accelerator
Setting these in the CRD or in the accelerator.yaml file within the repo is completely a matter of preference, where i personally prefer to define it in the repo itself and keep my CR manifests as simple as possible but as mentioned it is simply a matter of personal preference.
Git Source Fields
The Git section is the section in which most of our configuration is done in a typical situation.
This is the section in which we define the connection between the accelerator CR and the Git repository where our accelerator.yaml and templated repo resides.
their are many different options for configuring the git source where most of them are directly mapped to fields in the Flux Source Controller GitRepository CRD which is used in the backend to pull and monitor our git source for updates.
The fields we can configure are:
- git.url – The repository URL, can be a HTTP/S or SSH address.
- git.interval – The interval at which to check for repository updates (defaults to 10 minutes)
- git.subPath – When an accelerator is not at the root of the repository, subPath can be used to specify the root directory of the accelerator
- git.secretRef – If the source repository requires authentication, this should be set to the secret name containing the git credentials. For HTTPS repositories, the secret must contain user name and password fields. For SSH repositories, the secret must contain identity, identity.pub, and known_hosts fields.
- git.ref – an object with different keys underneath that can support which git reference to use for pulling the correct version of the accelerator repository.
-
-
- git.ref.branch – the Git branch to checkout (defaults to master)
- git.ref.tag – the Git tag to checkout. This field has precedence over the branch value
- git.ref.semver – the Git tag semver expression to use to find the latest relevant tag. This field takes precedence of the tag value.
- git.ref.commit – the Git commit SHA to checkout. This field has the highest priority.
-
While as we will see in a moment we can use accelerators without a Git repository, it is highly recommended and much easier to maintain long term, when using Git as the source of our accelerators.
OCI Bundle Source Fields
The final section of configuration options in the accelerator CRD is nested under the “source” key.
Like with most other parts of the platform, we can use an OCI bundle which is generated via the imgpkg tool from the carvel toolset, to store our manifests inside a container registry instead of within a Git repository.
While this is supported to be used for all use cases, the main use case for it, and the only one I would personally consider using it for, is for quick iteration on a accelerator when doing the initial scaffolding.
The quick iteration workflow is performed in a similar manner to how it is done with the VS Code Local iteration workflow, where the Tanzu CLI accepts a flag “–local-path” where we point it to a path on our local filesystem, and we also provide a flag “–source-image” where we define the image URI for where to push the auto generated OCI bundle. This process will automatically generate the OCI bundle, push it to our registry (you must be logged in to the registry on your machine via docker login), and configure the accelerator CR to point to that image URI.
The fields available for configuration under the source key are:
- source.image – This is a reference to an image in a remote registry.
- source.imagePullSecrets – ImagePullSecrets contains the names of the Kubernetes Secrets containing registry login information to resolve image metadata.
- source.interval – the interval at which to check for repository updates
- source.serviceAccountName – the name of the Kubernetes ServiceAccount used to authenticate the image pull if the service account has attached pull secrets.
This can make local iteration easier, especially in organizations with stricter configurations on the Git server, which can delay the time it takes to be able to test out the accelerator.
As you can see, while simple and concise, the accelerator CRD offers us just the right level of configuration knobs, to define from where, and how to access the source code of the accelerator.
Fragments
After tossing around the term “fragment” many time throughout this post so far, lets now actually look at what a fragment is, why we would use them, and how we can use them.
Why do we need fragments
When we build out more and more accelerators, one of the things we can notice pretty quickly, is that there is often a lot of repetition and copy paste work involved between our accelerators.
More often then not, our accelerators will contain at least a few shared aspects whether that be options or transformations, and it can become difficult to manage at scale a fleet of accelerators, without being able to pull out shared logic and reuse it easily within all of the relevant accelerators.
This is why App Accelerator introduced a composition feature in the tool that allows re-use of parts of an accelerator, named Fragments.
What makes up a fragment
A great aspect of how this feature was implemented, is that a fragment is designed to look and behave nearly the exact same way as an accelerator does. It is made up of a set of files in a git repository, and contains an accelerator.yaml, with options, imports and engine sections exactly the same as within an accelerator.
This difference is that they are exposed to the platform via a different type of CRD namely a fragment.
How is a fragment added to the platform
The fragment CRD is a stripped down version of the accelerator CR, with the same git key under the spec section allowing us to point at our source code in a git repository in whichever manner we would like. it also contains a displayName field which provides a short and descriptive name for the fragment.
All other fields are not present in this CR, as you don’t invoke a fragment directly, nor is it visible in the catalog of App Accelerator. It also doesn’t support being based on an OCI bundle and requires the source to be a git repository.
Example use case for fragments
While the examples are endless, some common examples for fragments could include:
- Backstage configuration files – this could be an easy way to manage templates for different backstage configuration settings for components, domains, systems, apis etc. This then can be imported into any accelerator to allow configuration options for managing the backstage configuration yaml files.
- Language version selection – In many organizations, we may want to standardize on a set of specific versions of a language or framework we support. While we could give a dropdown for example in a Java based accelerator to select the Java version to user, or the same goes for any other language or framework, wouldn’t it make a lot more sense to pull this config out of our accelerators, and simply import this fragment into all of the accelerators based on that language? this would allow us to easily update the list of versions we support in one central place and not need to update dozens of accelerators anytime we want to support or remove support for a version.
- Live update Tiltfile – we can extract the Tiltfile to a seperate fragment and simply import it into our accelerators that support live update functionality. This allows us to update the base Tiltfile in a central location and simply reference it within all of our relevant accelerators.
- TAP Workload Yaml – the number of permutations of how one could configure a workload CR are huge with the OOTB supply chains, let alone with custom supply chains. Pulling out the workload yaml templating into a separate fragment allows us to make changes and expose new options for configuration in a centralized way and gain the benefits automatically across all of our accelerators.
The options are truly endless, but I hope that the above examples give you an idea of how fragments could be used to help simplify and accelerate the process of building and maintaining a fleet of accelerators.
Example Custom App Accelerator
I have put together a few custom app accelerators, that implement a lot of the different transformation options, different input types and and configuration capabilities as well as some heavy usage of fragments to emphasize the benefits they can bring.
The example accelerators and fragments are available in a public Github repository and will be updated overtime with more and more examples.
If you have any questions, suggestions or things you would like to see in that repo, feel free to open up issues or PRs!
Now that we have covered what an accelerator is, how we build one, how we add one to our platform, and also how we can use fragments to make them composable and enable reusage of shared functionality, lets now take a look at App Accelerator from a consumption perspective.
How to invoke an accelerator
An accelerator can be invoked via 3 main interfaces where 2 of them are UI based wizards and the other is a CLI based mechanism.
Lets take a look at the features, pros and cons of each of these different interfaces, and try to understand in which use cases, each of these tools would make sense to be used.
TAP GUI
The main User interface for App Accelerator is provided via a custom Backstage plugin provided as part of TAP GUI.
This interface allows end users to view the catalog of available accelerators, filter based on tags or search for them via a search bar.
It also provides a button which can open up in a new tab the source repository that backs the specified accelerator, and also a button to choose an accelerator to use, which will open up the accelerators input form in a simple graphical UI.
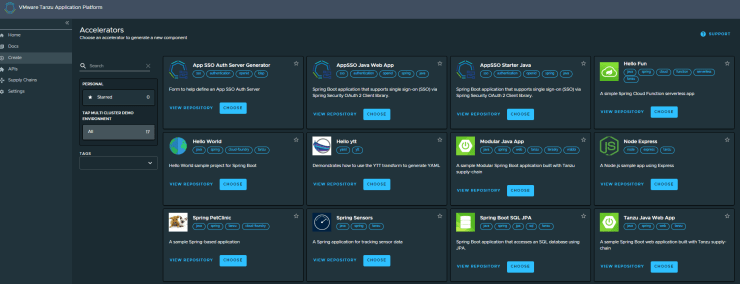
If we take for example the OOTB accelerator for the sample “Tanzu Java Web App” the input form is very simple and basic:

Once we have filled in the options available in the accelerator, we can simply click next and will receive the following page:

In order to generate the final project we can simply click on the “Generate Accelerator” button which will run the accelerator engine for our new project and that will provide us with the following screen:

We can see in the right hand side, the logs of the accelerator generation task, and on the left we are provided with 2 options.
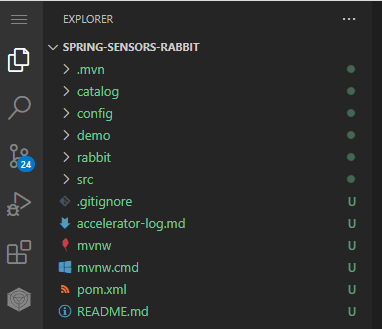
We can click the download button which will open a window to select where we want the zip file with our templated project to be saved on our machine and we are ready to start iterating on the code locally!
We can also click on the “Explore zip file” button which will open a file browser modal where we can view the generated accelerator files

Just to show what a more complex accelerator form may look like here is the form for one of my custom highly customizable accelerators for a Java web app that integrates with App SSO:

Overall, the experience using the TAP GUI interface is pretty great and simple!
While this plugin works great, and provides a very good UX, one thing that is becoming ever so clear these days in all sorts of polls and research, is that developers want to live within their IDE and want to stay within the boundary of their IDE as much as possible. This is where the next interface comes into play.
VS Code Extension (Beta)
In TAP 1.2 amongst all of the amazing new capabilities, we also got a new VS Code Extension which is for App Accelerator.
This plugin enables us to explore the available accelerators in our platform, and generate a new project from one of them.
The configuration of the plugin is extremely easy and we only need to provide the URL of our App Accelerator server’s Ingress:

Once we have configured the accelerator URL in the VS Code extensions settings, we can go to the “Tanzu App Accelerator” extension in the list on the left and view the list of accelerators.
Once we click on a specific accelerator we want to use, a form is opened on the right to generate the project:

As we can see, we have a very similar form UX as we get in the TAP GUI interface, however this is provided directly in the IDE!!!
The other great feature of this plugin, is that when we click on the “Generate Project” button, we are prompted with a popup to select where we want the generated project to be saved, and once we set that, the accelerator will run, and a new window of VS Code will be opened with the workspace set the the newly generated project!

While their are some rough edges currently in the extension, the overall approach and UX is pretty awesome!
Being able to consume accelerators directly from the IDE is an amazing feature, and I really think that this is a perfect example, of how VMware are really focusing in TAP on meeting the different personas where they are, and providing the integrations into each personas natural ecosystem of tooling in a truly awesome way!
While UIs are great, and we often really like the experience they provide, some people or certain use cases, simply require a CLI or API based approach, and that is where the next interface comes into play.
Tanzu CLI – Accelerator Plugin
The Tanzu CLI has a dedicated plugin which is fully dedicated to App Accelerator.
Through this plugin, we can create, apply, update and delete accelerators and fragments.
We can use the CLI to view which accelerators we have:

We can then get the input options and details for a specific accelerator:

And now we can generate a project from the accelerator:

And that generated in my current directory a zip file with the newly generated project!
Summary
I am a big fan of the Application Accelerator functionality in TAP, especially with the new features that have been added in TAP 1.2!
I hope that this blog post has been helpful in organizing the subject of Application Accelerators for you, and given you a bit more of an understanding on the features available within the tool, and truly how extensible and customizable we can make our platform by creating some custom accelerators that are really well adopted and suited for your organization.
I am excited also to see where this project goes moving forwards in terms of new features and UX enhancements!
It is great to see how VMware have built a truly awesome technology, based on upstream open source plugins in backstage, and added that additional enterprise grade wrapper and feature enhancements to create a very cohesive and good experience for both the Enterprise architects or SREs that will define the accelerators, as well as for the developers who will be consuming the accelerators.
One Reply to “”